
So after the first baby steps using HTMX in Xpages and classic elements, we will go forward by starting to access Domino data from HTMX. We will start with a common use case - display the data from a View and add features like sorting to the view.
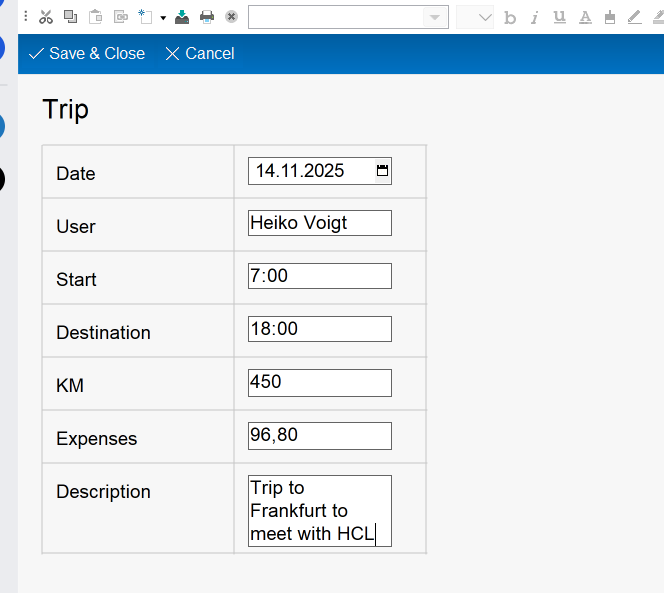
To keep it simple, we will start with a base form and and a base view in a Notes App. Here is a screenshot of the view. The db will save trip expense data.

The corresponding forms looks like this:
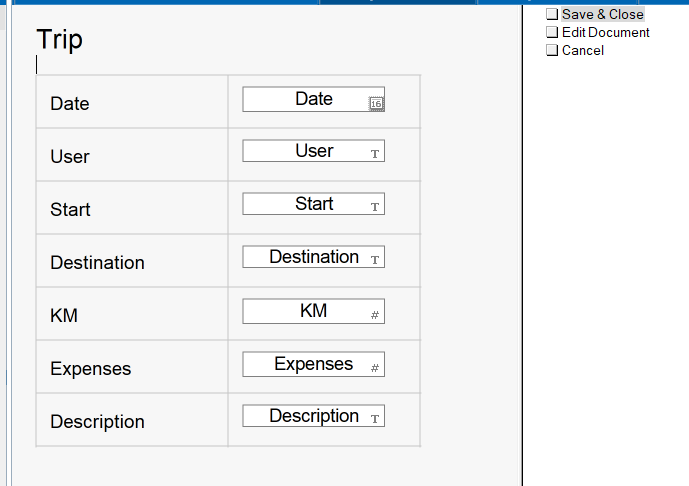
The form design looks like this:
The result for part 4-6 will look like this:
In this part, we will hook up to the data on HCL Domino and display the data as a raw HTML table. In part 5, we will add columns sorting and in part 6 we will add a refresh button and learn about HTMX Event handlers and how to trigger them via Response Headers.
Let's start with the data part.
To get to the data, we have to create an extension to our REST API bean that will return our view data. To prepare us for an extra problem, we will return the data of the view as JSON data.
Why is JSON a problem here? Isn't that what most REST APIs will return? Yes, that's true - but HTMX expects to receive HTML from a call. So let's see how we can solve this issue.
First let's start with the extension of the rest api bean. I added a new GET method called /xsp/apihandler/readviewentries/:replica-id/:view-alias . It uses the replicaid of the respective database and the view alias to read the view data from the respective database. This method will return a JSON object like this:
{
"result": "OK",
"request": "readviewentries",
"viewname": "trips",
"data": [
{
"Destination": "Frankfurt",
"KM": "440.0",
"unid": "FBE7C09AFC70A64BC1258D12005B1DDD",
"User": "Heiko Voigt",
"Description": "Visit at the IBM SAP Competence Center",
"Start": "Kayh",
"Expenses": "95.0",
"Date": "15/09/2025"
},
{
"Destination": "Stuttgart",
"KM": "80.0",
"unid": "C85F783B2F9A2EE0C1258D12005B3129",
"User": "Heiko Voigt",
"Description": "Customer visit",
"Start": "Kayh",
"Expenses": "20.0",
"Date": "16/09/2025"
},
{
"Destination": "München",
"KM": "440.0",
"unid": "D7C6488DC9C37F1AC1258D12005B417C",
"User": "Heiko Voigt",
"Description": "Oktoberfest",
"Start": "Kayh",
"Expenses": "250.0",
"Date": "17/09/2025"
},
{
"Destination": "Frankfurt",
"KM": "450.0",
"unid": "4E7436B7BBA1EE3CC1258D3E003931B6",
"User": "Heiko Voigt",
"Description": "Trip to Frankfurt to meet with HCL",
"Start": "7:00",
"Expenses": "96.8",
"Date": "14/11/2025"
}
],
"replicaid": "C1258D12005521AA",
"error": "",
"timestamp": "2025.11.10.11.27.03",
"username": "Heiko"
}
In this JSON Object, we have an array of trips that we will be looping through using HTMX to generate a table wit the view content.
Technically, we could also generate a webhook that delivers ready made HTML here - but as we want to connect to the Domino REST APIs later down the road let's take a look at consuming JSON with HTMX right now.
The idea on how to solve this issue is to create a template of what we want to build, in our case a table row and then build a loop logic that iterates our JSON array of trips and creates a table row from the template for each row. Luckily enough, there is an extension for HTMX that does exactly that: it's called "HTMX-JSON". Here's the link to the github repo: https://github.com/mariusGundersen/htmx-json
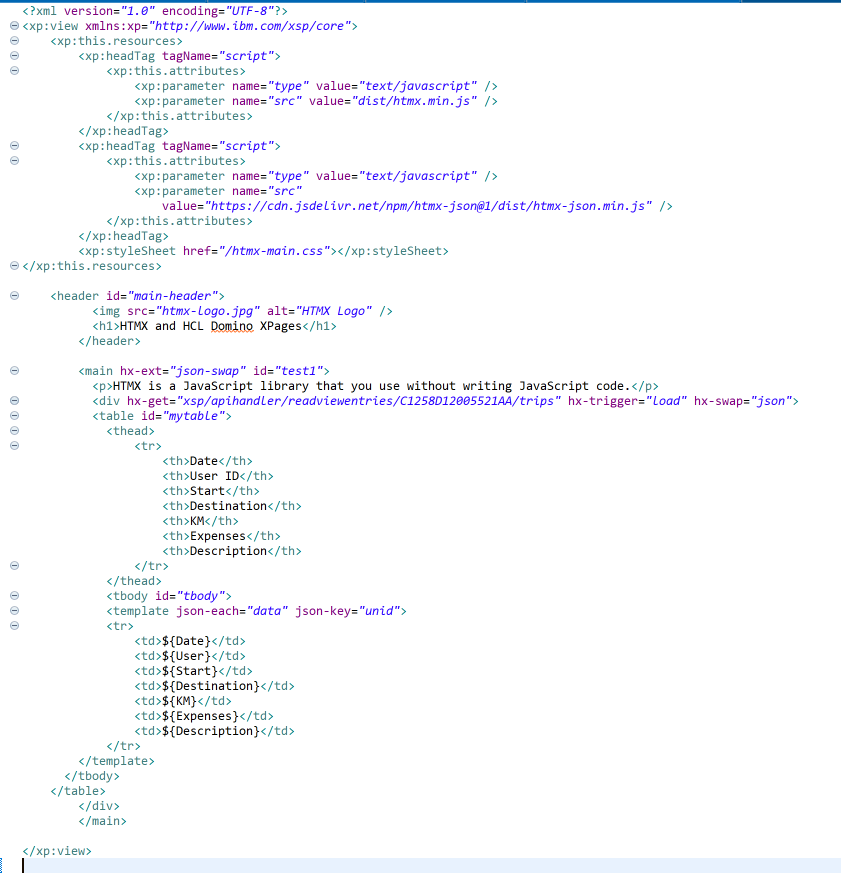
To use it, we have to load the extension in our Xpage, so we add a new <xp:headRag>:
<xp:this.attributes>
<xp:parameter name="type" value="text/javascript" />
<xp:parameter name="src" value="https://cdn.jsdelivr.net/npm/htmx-json@1/dist/htmx-json.min.js" />
</xp:this.attributes>
</xp:headTag>
To use the Extension, we add it to our <main> block definition:
Then, inside of our <main> block, we add a new <DIV> to load our JSON data. This also gets the hx-swap tag
So here is our GET call, triggered on page load returning JSON data,
Then, we start building our table:
<thead>
<tr>
<th>Date</th>
<th>User ID</th>
<th>Start</th>
<th>Destination</th>
<th>KM</th>
<th>Expenses</th>
<th>Description</th>
</tr>
</thead>
<tbody id="tbody">
in the table body is where the "Magic" happens - here we build and call a template for each row:
<tr>
<td>${Date}</td>
<td>${User}</td>
<td>${Start}</td>
<td>${Destination}</td>
<td>${KM}</td>
<td>${Expenses}</td>
<td>${Description}</td>
</tr>
</template>
So here we tell HTMX-JSON to use the "data" array in our JSON and fill out the template for each row. The Placeholders define the JSON Object names in each row.
After that, we just finalize our table, our div and our main section like so:
</table>
</div>
</main>
So for now, our XPage Code looks like this:
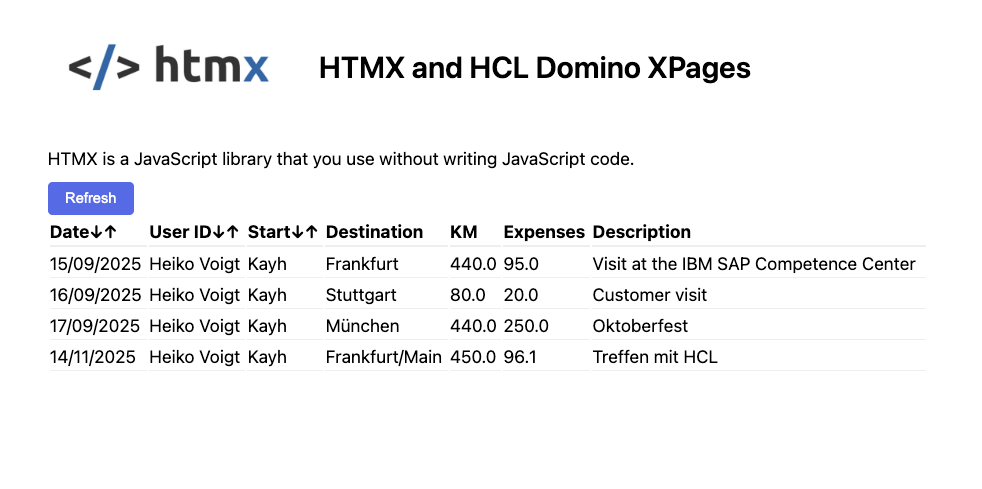
And this gives us the following result:
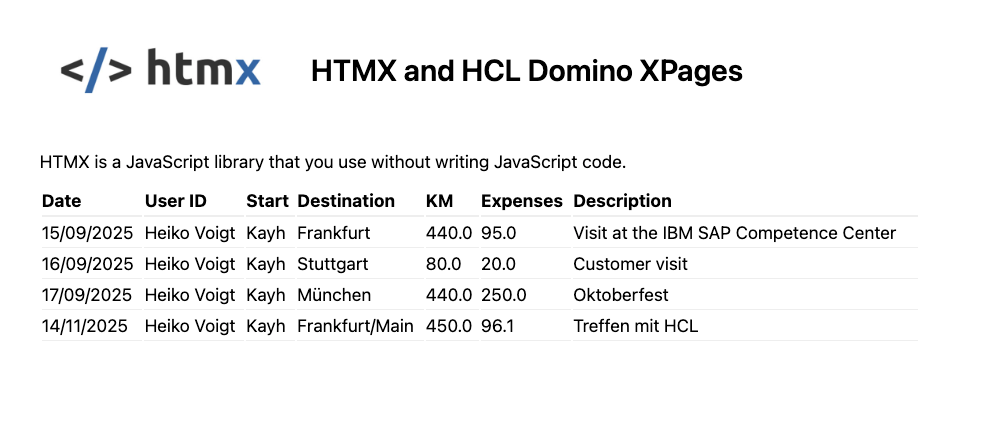
So - we see the data! This gives you a basic idea on how to call a REST API on Domino and process JSON data using templates in HTMX and HTMX-JSON. We also learned about HTMX Extensions and how we can use them.
But - we want more, right? To refresh, we have to reload the whole page so let's see if we can change that. Column sorting would be nice as well. And maybe we want to interact with the data set as well - stay tuned for the next chapter !
Cheers,
Heiko.